
Setting up a Vulcanize Grunt task in Visual Studio 2015
Developing Web Components from the new Visual Studio 2015 is a great experience with the added tooling. One problem with Web Components can be the large number of html-imports a big app will trigger. Even though an app might not be that large in actual code base size, it might be performing badly due to the sheer amount of loads needed to for all sub components.
The best way to reduce the amount of calls is to use Vulcanize, a tool that will concatenate your web components into one file.
Prerequisites and notes
First off, this solution builds upon the assumptions that all your html-imports are gathered in one file and one file only. This would be the file referred to as elements.html.
In my projects I have no html-imports in any of my Polymer elements. Any new imports I need I just add to the elements.html file instead, and I make sure I load that first thing in the apps life cycle. I am importing the polyfill library webcomponents.js and Polymer.html prior to my own components. I am keeping Polymer outside my own elements file to reduce time slightly, but mostly just because I had some initial problems when including it and in lack of having time to tinker with it so I just kept it out. You can see this exclusion under the configuration section, and you can expand on this to exclude other elements should you feel like it.
Secondly, a folder named built needs to exist under your wwwroot to accept the output from the vulcanization.
Install the grunt-vulcanize task
First install the grunt-vulcanize task by adding it to package.json:
{
    "version": "0.0.0",
    "name": "app_name",
    "devDependencies": {
        "grunt": "^0.4.5",
        "grunt-bower-task": "^0.4.0",

        //add the row below (version number might of course vary depending on point in time)
        "grunt-vulcanize": "^0.6.1"
    }
}
Configure the vulcanize task
Setup the vulcanize task in gruntfile.js by adding the section below to the grunt.initConfig method:
  vulcanize: {
            default: {
                options: {
                    strip: true,
                    excludes: {
                        imports: [
                          "polymer.html"
                        ]
                    }
                },
                files: {
                    'wwwroot/built/elements.html': 'wwwroot/pages/elements.html'
                },
            },
        }
In the task you can see how it is setup to exclude the polymer.html file, and also how removing comments and blocks of white-space by setting strip to true (it’s default is false). For all the options refer to the Grunt-Vulcanize ReadMe.
Under the files setup, do notice that the first parameter is the destination file and that the second parameter is the original file that should be vulcanized.
If you want it you can add a task alias for your vulcanize setup with:
grunt.registerTask("main_vulcanize", ["vulcanize:default"]);
And then don’t forget load the grunt-vulcanize plugin at the end of your file:
grunt.loadNpmTasks("grunt-vulcanize");
Running Vulcanize from Task Runner Explorer
First open the Task Runner Explorer in Visual Studio 2015 by expanding View>Other Windows and click Task Runner Explorer. Expand image to the right to see location of the Task Runner Explorer in the menu. 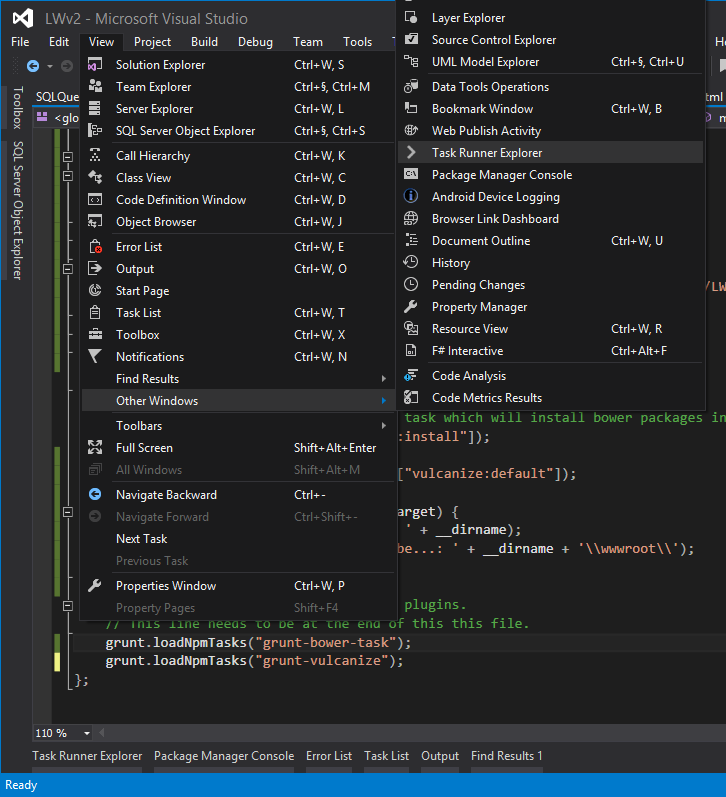
In the Task Runner Explorer window you can then see your vulcanize task as well as any Alias you setup for it, see image below.
Running your vulcanize task is now as simple as:
- Double clicking your alias name or the task name
- Right clicking alias name or task name and selecting “Run” from the context menu
- Binding the task or alias in the context menu to one of the build steps, below I choose to bind it to “After Build” which means my vulcanization will be run automatically after every time I build my project. Very nice since ctrl-shift-b is inprinted in muscle memory by now 😉

can you tell me how to do the same thing in visual studio 2012??
To run Grunt tasks from within Visual Studio you need some kind of launcher extension. For VS2013 you can use Task Runner Explorer.
I personally haven’t tried it but Grunt Launcher is supposed to support VS2012. If you try it out, please feel free to let me know if it works 🙂