
Setup and use the router in an Aurelia SPA
![]()
Welcome to the fifth episode about writing an Aurelia SPA, where we take a look at the Router and implement some Routing in our Aurelia SPA.
We’re going to implement a few more pages in our SPA, and then setup a route table to enable navigation to them.
The “Aurelia SPA built with TypeScript and Sass on .NET Core” Series
These are the parts of this blog post series about building a SPA in Aurelia.
Part I – How to: Build an Aurelia SPA with TypeScript on ASP.NET Core
Part II – How to: Build a Web API on ASP.NET Core for an Aurelia SPA
Part III – How to: Fetching data from a Web API on ASP.NET Core to an Aurelia SPA
Part IV – How to: Creating Aurelia Custom Elements with TypeScript
Part V – How To: Configure and Use the Router in an Aurelia SPA
Aim of this Post
To handle all our droids, we need more pages than just the page listing the existing droids. We’re going to create a page with detail info and a page for deleting droids. Since a first page is always nice to have, we’re going to implement that as well, so that we have a page welcoming users to the SPA.
To handle this multi page SPA scenario, we need a Router. The Router is the mechanics responsible for looking at incoming requests and serving the right page. And we’re going to setup what’s called a Route Table, basically just a definition of all the viable routes in our web app.
Creating New Pages
Continuing where we ended in the previous post, we need a few more pages.
So we need to make the following changes to our project:
- Create new folder structure, add views/droids/
- Add a new page (just like an element) in the folder created in the step above. Name the page list, and thus create list.html and list.ts
- Move code from app.html to list.html
- move code form app.ts to list.ts
- Add a new page, named detail, will be used to show detail info for droids
- Add a new page, named delete, will be used to delete droids
- Create new folder structure, add views/droids/
- Add a new page, named index in the folder created in the step above.
Let’s start from the bottom of this list, with creating our “home page”.
Creating a Home Page
We need a default page for our SPA, one that will greet users when they first start our app.
We need to create a new folder structure under src, namely /views/home.
In this folder we create an index.html file and an index.ts file.
The page won’t contain anything more than a greeting to start out with, edit the pages like this:
<template>
Welcome to Droid Worx!
</template>
export class Index{
    constructor(){};
}
Moving Logic to a New List Page
The logic we implemented in the previous part of the eseries, where we list our droids, is still needed.
However we need to move it out from our app-page.
Create a new folder under views, name it /droids.
In this folder we need to create a list.html and list.ts, we’re moving over the old logic from app.html and app.ts respectively.
<template>
  <require from="./../../resources/elements/droid-tile.html"></require>
  <h1>${header}</h1>

  <droid-tile repeat.for="droid of droids" droid.bind="droid"></droid-tile>
</template>
Observe that the path to the droid-tile element changed since we are referring to it from a in a different part of our folder structure now!
import { Router } from 'aurelia-router';
import { HttpClient } from 'aurelia-fetch-client';
import { autoinject } from 'aurelia-framework';

@autoinject
export class List {
  public header = 'Droids';
  public droids: any;

  constructor(private http: HttpClient, private router: Router) {
    http.configure(config => {
      config
        .useStandardConfiguration()
        .withBaseUrl('http://localhost:5005/api/droids');
    });
  }

  activate() {
    return this.http.fetch("")
      .then(response => response.json())
      .then(droids => this.droids = droids);
  }
}
Adding a Details Page
Time to add a details page, under views/droids/, add detail.html and detail.ts.
<template>
    <h1>${droid.name}</h1>
    <div>
        ID: ${droid.id}
    </div>
    <div>
        Height: ${droid.height}
    </div>
    <div>
        Weight: ${droid.weight}
    </div>
    <div>
        Product Series: ${droid.productSeries}
    </div>
    <div>
        Imperial Contract: ${droid.imperialContractId}
    </div>
    <div show.bind="droid.equipment.length>0">
        Equipment:
        <ul>
            <li repeat.for="item of droid.equipment">
                ${item}
            </li>
        </ul>
    </div>
    <div show.bind="droid.armaments.length>0">
        Armaments:
        <ul>
            <li repeat.for="item of droid.armaments">
                ${item}
            </li>
        </ul>
    </div>
</template>
In this file there are one new concept we’ve haven’t used in this post series yet.
That is the conditional rendering binding used for armaments and equipment. This binding states that if the condition is not met, the element will be hidden. When using show.bind on an element, it will be rendered in the DOM, but the class aurelia-hide will be appended to it.
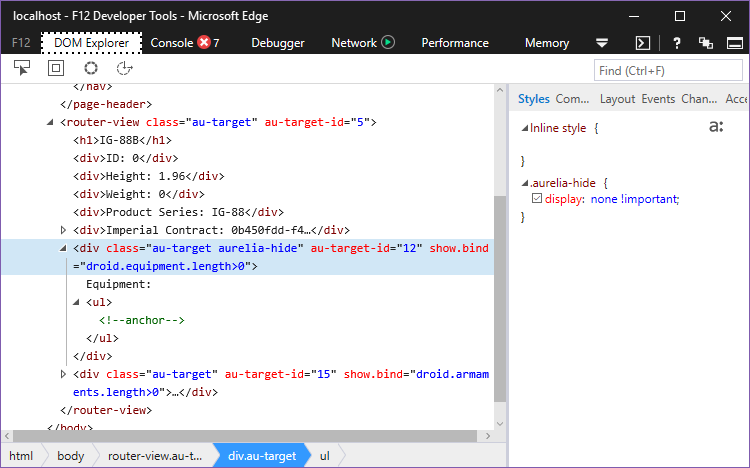
As can be seen in the screenshot, aurelia-hide sets the element to display: none !important, to hide the element.
There is also a binding that completely removes elements from the DOM if it’s conditions isn’t met, and it’s used like this if.bind=”condition”.
Implement the view-model, detail.ts, like this:
import { autoinject } from 'aurelia-framework';
import { HttpClient } from 'aurelia-fetch-client';

@autoinject
export class Detail {
    public droid: any;

    constructor(private http: HttpClient) {
        http.configure(config => {
            config
                .useStandardConfiguration()
                .withBaseUrl('http://localhost:5005/api/droids/');
        });
    }

    activate(params, routeConfig, $navigationInstruction) {
        this.http.fetch(params.id)
            .then(response => response.json())
            .then(droid => this.droid = droid);
    }
}
One new concept is introduced here as well, and that’s the activate method taking parameters.
On the params we’ll assume there’s an “id” property that corresponds to a droids id. We use this to fetch info about a specific droid.
We’ll go in to more in detail where this parameter value comes from, and how we use it to pass data when we call this page.
Implementing a Page for Removing Droids
Create a delete page under the /droids folder:
<template>
    <h1>${droid.name}</h1>
    <div>
        ID: ${droid.id}
    </div>
    <div>
        Product Series: ${droid.productSeries}
    </div>

    <div>Are you sure you want to delete this droid?</div>
    <button click.delegate="deleteDroid()">Delete</button>
</template>
One new concept being introduced here, a button click-handler.
As you can see in the view, we use a button to confirm a delete of a droid. The buttons click-handler is bound to a method in our view-model, named deleteDroid.
Binding the handler is done with click.delegate. Not that click.delegate won’t always work for all browsers, then you can use click.trigger, but the default is to use click.delegate.
The view-model for delete looks like this:
import { Router } from 'aurelia-router';
import { autoinject } from 'aurelia-framework';
import { HttpClient } from 'aurelia-fetch-client';

@autoinject
export class Delete {
    public droid: any;

    constructor(private http: HttpClient, private router: Router) {
        http.configure(config => {
            config
                .useStandardConfiguration()
                .withBaseUrl('http://localhost:5005/api/droids/');
        });
    }

    activate(params, routeConfig, $navigationInstruction) {
        this.http.fetch(params.id)
            .then(response => response.json())
            .then(droid => this.droid = droid);
    }

    public deleteDroid(): void {
        let request = {
            method: "delete"
        };

        this.http.fetch(this.id.toString(), request).
            then(response => {
                alert("Droid deleted!");
                this.router.navigateToRoute('droids');
            });
    }
}
A new concept get’s introduced here as well, the Request object being used when initiating the Fetch request. Previously we’ve only used the default Fetch configuration, but if we want to do anything except just call GET methods, we need to supply a Request object. In this case we use it to specify that our call will be a DELETE and not a GET.
Implementing the Aurelia Router
We need to replace the implementation of the app page now. The view will be replaced by a place holder where Aurelia will inject other, routed views. And in the view model we will be configuring the Router to handle our planned page setup for the SPA.
Adding the Router View
First of all, the Router needs a target element, in which it will render it’s content. That element is the router-view element.
Modify app.html like this:
<template>
	<router-view></router-view>
</template>
Nothing complex going on in this view, just defining the router-view element, so that the Router will have a target to inject pages in.
And as always, don’t forget to encapsulate the view in a template tag!
Adding the Router View Model
We’ll put the router logic in the app.ts file. In it we will define the Router Configuration. And the Router config will hold our route table, defining the routes and pages they lead too.
Let’s modify app.ts like this:
import { autoinject } from 'aurelia-framework';
import { RouterConfiguration, Router } from 'aurelia-router';

@autoinject
export class App {
    public router: Router;

    configureRouter(config: RouterConfiguration, router: Router): void {
        this.router = router;

        config.title = 'Droid Worx';
        config.map([
            { route: ['', 'home'], name: 'home', moduleId: 'views/home/index', title: 'Home', nav: 0 },
            { route: 'droids', name: 'droids', moduleId: 'views/droids/list', title: 'Droids', nav: 1 },
            {
                route: 'droids/:id',
                name: 'droidInfo',
                moduleId: 'views/droids/detail',
                title: 'Droid Info',
                nav: false
            },
            {
                route: 'droids/:id/delete',
                name: 'droidRemove',
                moduleId: 'views/droids/delete',
                title: 'Delete Droid',
                nav: false
            },
        ]);
        config.mapUnknownRoutes('views/home/index');
    }
}
Quite a few new concepts being introduced in this code, let’s have a deeper look at them in them.
Router Configuration and Route Setup
Setting up a Router in Aurelia means implementing a configureRouter method.
In the configureRouter method we setup a RouterConfiguration that will determine the functionality of the Router. The RouterConfiguration is also used to setup the routes for the Router.
Let’s dive into the configureRouter method:
- A tittle is going to be used in the tab heading of the browser when opening the web app. It’s a combination of the Routers main title and a pages title.
So in our case, if we are on the first page titled Home, the tab header will read Home | Droid Worx.
You don’t have to set a title, in that case in the example here for the home page would make the tab header just say Home.
- Next, it’s the mapping of the routes table. Here we define all the routes that the router will handle for our SPA.
-
Looking at the first line we can see route property, which takes a string or an array of strings. This is what will be matched against the URL entered in the browser.
So our first route will be matched against “localhost:5000/” and “localhost:5000/#/home“
- Second is the name property, this is just a name we want to call the route and it’s used when referring to this route from other Aurelia methods, for ex navigateToRoute
- Then we got moduleId. This is the module being rendered into the router-view element when the route is navigated too, or the page, if you like
- After this, we define the routes title. This is the page title, that will be combined with the configurations main title, as described in the example above
- Last, in our config, is the nav property. This is a property that can be used as a convenience to determine if the route is supposed to be used in any kind of navigation structure.
The value of nav can be either a boolean or a number
-
- Last in our config we set mapUnknownRoutes. This takes care of any other routes being entered in the browsers url window, and routes them to our Home page.
If not defining mapUnknownRoutes, the default behavior of the router is to do nothing at all when any route is entered that don’t have a match in the route table
Testing the Routing
So now we have routing. We can test the pages, using the following URLs:
- localhost:5000 – Takes us to our Home, the index page
- localhost:5000/droids – This leads to the page listing all our droids
- localhost:5000/droids/1 – Leads to the page showing detail info for a Droid with Id 1
- localhost:5000/droids/1/delete – This takes us the a page where we can delete a droid with the given Id
However, some kind of navigation system would be nice, to make the app somewhat usable.
Adding a Header and Navigation
Let’s add a header section to the page, containing the page header, and a navigation menu.
Normally there’s more components and information needed in a web apps header. So why not use our newfound knowledge about components, and make the header a Custom Element? Then we can expand it later.
Creating the header Component
Use the Aurelia CLI, from the root of your project:
au generate element
Name the element page-header.
Implement it like this, page-header.html:
<template bindable="router">
  <h1>Droid Worx</h1>
  <nav>
    <ul>
      <li repeat.for="row of router.navigation">
        <a href.bind="row.href">${row.title}</a>
      </li>
    </ul>
  </nav>
</template>
This is a fairly simple element, so we don’t need any backing view-model for it. An there is actually no new concepts introduced, that we haven’t seen before.
The only thing that is a bit different is that we’re passing in a Router, an object created by the Aurelia Framework itself, and using various properties of that to display data.
Modify Main App Page to use new Header Component
Use the new page-header component form app.html, like this:
<template>
	<require from="./resources/elements/page-header.html"></require>

	<page-header router.bind="router"></page-header>
	<router-view></router-view>
</template>
If you wondered previously, why we stored the router in a property in our app.ts above, here is the answer. Because we need to pass it in to our page-header element. 🙂
Navigating from Droids in the List to a Details Page
Now that we got routing setup, it’s time to setup navigation from the list to a details page.
Modify list.html like this:
<template>
  <require from="./../../resources/elements/droid-tile.html"></require>
  <h1>${header}</h1>

  <droid-tile repeat.for="droid of droids" droid.bind="droid" click.delegate="tileClick(droid)"></droid-tile>
</template>
And add the following method to list.ts:
tileClick(droid: any): void {
    this.router.navigateToRoute('droidInfo', { id: droid.id });
  }
This is the navigateToRoute function in action, it will take us to the route with the given name, and substitute “id” in the route with the parameters we supply.
Conclusion
Our Aurelia SPA now has Routing. We know how to create pages and elements. We’ve looked at how to call endpoints in Web API’s, to both fetch and manipulate data. And we’ve used data-binding into our views quite a few times.
The result after this posts modifications looks something like this.
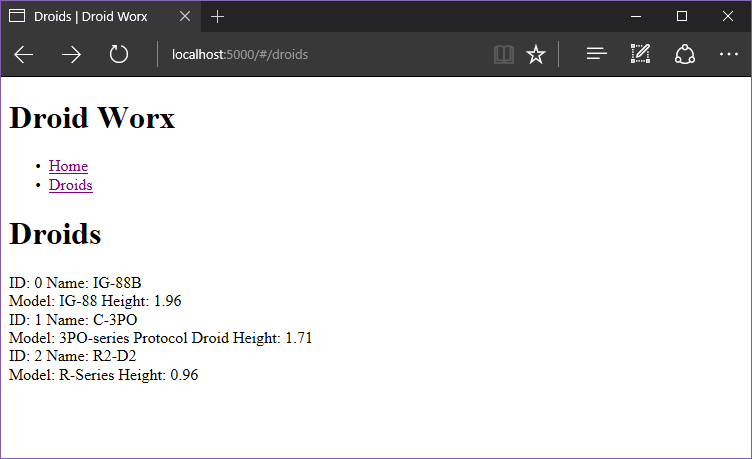
I think the grand conclusion now is – we need to start with styling!
Get the Code
The code for this blog series is available on my GitHub repo, you can find it here: DWx-Aurelia-dotNETCore
Hope you enjoyed this post! Leave a comment below if there’s anything that you think need more specifics. If you got questions or suggestions on more post topics, please comment about that as well!
Until next time,
Happy Coding! 🙂