
Writing a QnA bot in Aurelia
I wanted to write one of those nifty QnA bot’s that can be seen all over the web nowdays.
After having a look at the Microsoft Bot Framework, I stumbled on to the QnA Maker.
The catch phrase is “From FAQ to Bot in minutes”, and indeed it delivered.
Setup a QnA Database
First off you need to create the QnA database, then test it, then finally publish it and use it.
Creating a QnA Database
After signing in you get the option to create a QnA database from existing documents, URL’s or just start from scratch and enter your question and answers manually.
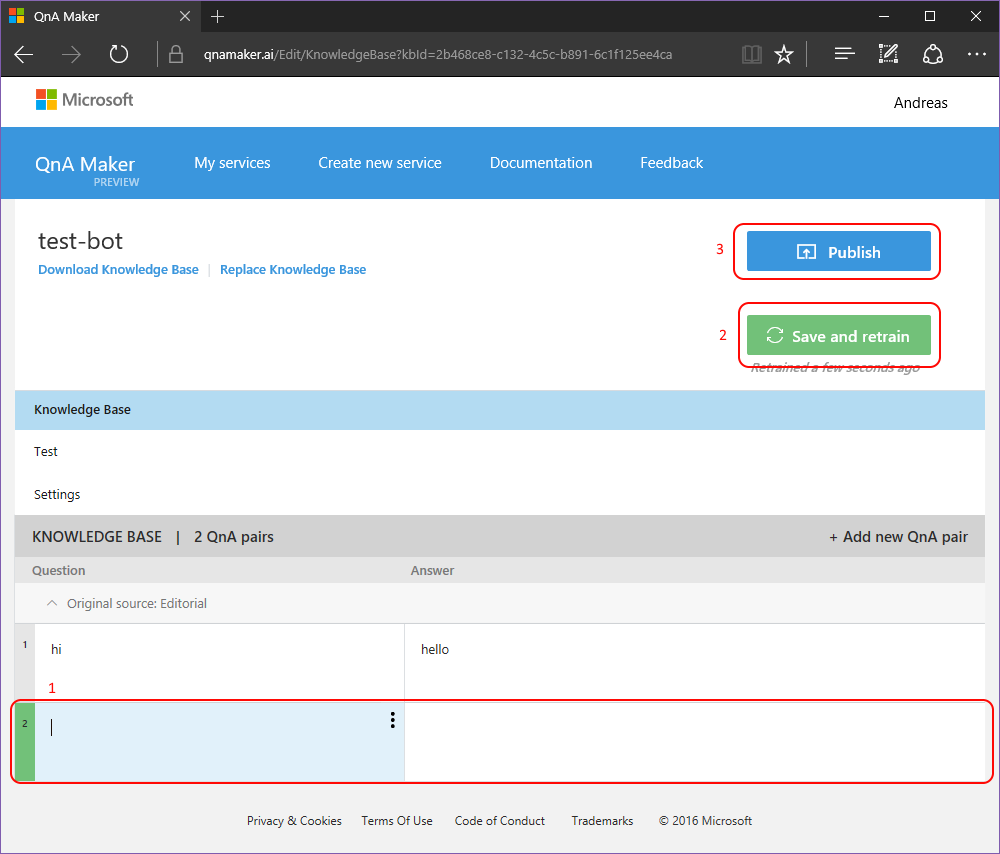
So first add whatever documents you like, and URL’s you have QnA on. I didn’t have any FAQ’s made, so I entered mine manually (see fig 1 in the image above).
If you enter any questions and answers manually, make sure to press Save and Retrain afterwards (button 2 in the image above).
Testing the QnA Database
After adding the pertinent questions and answers, you can also test your database. Press Test next to Knowledge Base and you’ll get a testing UI. In the test chat UI you can enter questions and see the answers. If you are not happy with the result you can also train the bot here, telling it to answer differently and adding alternative questions.
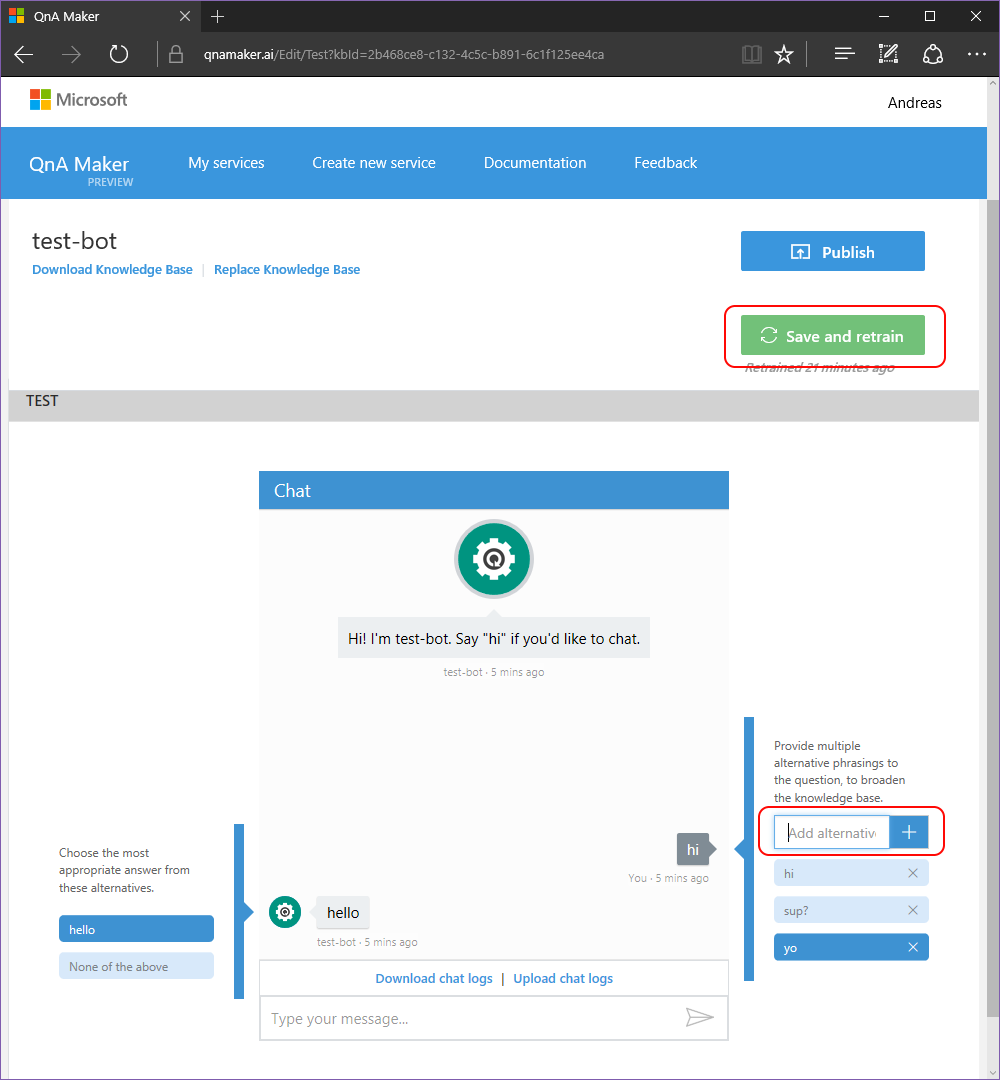
When done testing the bot, remember to Save and Retrain.
Publish the Bot
If you’re satisfied with the performance of the bot, or just want to test it, then Publish it (see button 3 in screenshot 1).
When you publish the bot, you will see a snippet of a sample request (this is also available from the overview of My services pressing View Code).

In this snippet you will have your bot ID and key that is going to be needed when calling the bot later from our Aurelia component.
Coding the Aurelia QnA Bot
I created an Aurelia component to hold my view and view model. But as I see the component as very static, ie you won’t be changing knowledge-base or security key several times during an applications life cycle, these are just defined as constants in the view model.
The view is just two components, an Input that takes questions, and a list repeater showing questions and answers.
In the view model I use the Aurelia Fetch library to get send questions to the QnA bot. Make sure to add the security key as a header, and to use the right URL for your knowledge base, as shown in the publish step.
I also set up a property observer to watch when the ScrollHeight changes on the div-element holding the questions and answers, and use it to adjust scrolling of the container.
The View:
<template>

  <div class="chat-area" ref="chatArea">
    <ul>
      <li repeat.for="expression of expressions" class="${expression.type}">
        <div class="message" innerhtml.bind="expression.text"></div>
      </li>
    </ul>
  </div>

  <div>
    <input class="question-box" type="text" placeholder="Ask a question..." value.bind="question" keypress.delegate="keyPressed($event)"></input>
  </div>

</template>
The View Model (click to expand):
import { bindable, autoinject } from 'aurelia-framework';
import { BindingEngine } from 'aurelia-binding';
import { HttpClient, json } from 'aurelia-fetch-client';

const API_URL = "https://westus.api.cognitive.microsoft.com/qnamaker/v1.0";
const SUBSCRIPTION_KEY = "39931b6971294fa398c52c54889c4136";
const KB_ID = "905f81b1-af8d-4276-8194-8bf0f22ef8b2";
const ENTER_KEY = 13;

@autoinject
export class QaBot {
  private question: string;
  private expressions: Array<Expression> = [];
  private chatArea: HTMLElement;
  private subscription: any;

  constructor(private http: HttpClient, private bindingEngine: BindingEngine) {
    http.configure(config => {
      config
        .useStandardConfiguration()
        .withBaseUrl(API_URL);
    });
  }

  attached() {
    this.subscription = this.bindingEngine.propertyObserver(this.chatArea, 'scrollHeight').subscribe((newValue, oldValue) => this.scrollChatArea());
  }

  detached() {
    this.subscription.dispose();
  }

  private keyPressed(event) {
    if (event.keyCode === ENTER_KEY) {
      this.send();
    }
    return true;
  }

  private send() {
    const headers = new Headers();
    headers.append("Ocp-Apim-Subscription-Key", SUBSCRIPTION_KEY);
    headers.append("Content-Type", "application/json");

    const question = { "question": this.question };

    const request: RequestInit = {
      method: "POST",
      headers: headers,
      cache: "no-cache",
      body: json(question)
    };

    this.expressions.push({ text: this.question, score: 100, type: "question" });
    this.http.fetch(`/knowledgebases/${KB_ID}/generateAnswer`, request)
      .then(response => response.json())
      .then((data: any) => {
        this.expressions.push({ text: data.answer.replace("\n", "<br>"), score: data.score, type: "answer" });
        this.clearQuestionField();
      });
  }

  private scrollChatArea() {
    this.chatArea.scrollTop = this.chatArea.scrollHeight;
  }

  private clearQuestionField() {
    this.question = "";
  }
}

interface Expression {
  text: string;
  score: number;
  type: string;
}
The styling (click to expand):
qa-bot {
  .chat-area {
    width: 400px;
    height: 400px;
    background-color: white;
    border: 1px solid darkolivegreen;
    color: white;
    overflow-y: scroll;
    overflow-x: hidden;

    ul {
      border: none;
      padding: 0px;
    }

    li {
      padding: 0.5rem;
      overflow: hidden;
      display: flex;
    }

    .question {
      border-top-left-radius: 0px;

      .message {
        box-shadow: 3px 3px 3px black;
        background-color: seagreen;
      }
    }

    .answer {
      justify-content: flex-end;
      align-items: flex-end;
    }

    .answer {
      border-bottom-right-radius: 0px;

      .message {
        box-shadow: 3px 3px 3px black;
        background-color: darkslateblue;
      }
    }

    .message {
      min-width: 50px;
      max-width: 300px;
      padding: 10px;
      word-break: none;
    }
  }

  .question-box {
    width: 382px;
  }

  input {
    line-height: 24px;
    padding: 8px;
  }
}
The Result
This is what the result looks like 🙂
Get the code
The code is published in my GitHub repository named Aurelia Components.
Happy Coding! 🙂