Setting up a TypeScript – RequireJS – MVC 6 web app in VS2015
Setting up a new Web Project in Visual Studio 2015 is easy!
Setting up a project and making TypeScript and RequireJS work together – not all that easy.
Hopefully this step-by-step guide will help you get up to speed quickly. We’re taking it from an empty web project to setting up MVC 6, TypeScript compilation with Gulp, retrieving definition files and finishing off with a module load with RequireJS.
Disclaimer: Please note that this article was written using Visual Studio Enterprise 2015 RC using the beta-4 bits. So if you are using a different version, some of the information in this article will not be accurate.
1. Creating a new Web Project
Open Visual Studio and:
- File-New-Project (Ctrl-Shift-N)
- Select ASP.NET Web Application
- Under ASP.NET Preview Templates select Empty
2. Add MVC to the project
First we need to add two more packages to the solution. Add the following to the dependencies section of project.json:
    "Microsoft.AspNet.Mvc": "6.0.0-beta4",
    "Microsoft.AspNet.StaticFiles": "1.0.0-beta4"
No we need to add some code to Startup.cs:
   public class Startup
    {
        public void ConfigureServices(IServiceCollection services)
        {
            services.AddMvc();
        }

        public void Configure(IApplicationBuilder app)
        {
            app.UseStaticFiles();
            app.UseMvc(routes =>
            {
                routes.MapRoute(
                    name: "default",
                    template: "{controller}/{action}/{id?}",
                    defaults: new { controller = "Home", action = "Index" });
            });
        }
    }
If you are unfamiliar with ASP.Net 5, we’ve just enabled MVC, enabled use of static files and setup a route handler for incoming requests.
Setup of the MVC parts
Add a folder to the project root named Controllers and one named Views. Inside the Views folder, add a folder named Home.
Add a HomeController.cs file to the Home folder, add the following code:
using Microsoft.AspNet.Mvc;
namespace TS_require_Web.Controllers
{
    public class HomeController : Controller
    {
        public IActionResult Index()
        {
            return View();
        }
    }
}
Add a cshtml file named Index.cshtml to the Home folder and add some html markup, like for ex:
<!DOCTYPE html>
<html>
<head>
    <title>TypeScript Module loading with RequireJS</title>
</head>
<body>

<h1>Setup project</h1>

</body>
</html>
Given everything is setup correctly now, it should be possible to run the project using the web command or with IIS Express.
3. Adding NPM packages
Now we need to add a a new file to retrieve some NPM packages needed. In the the project root create a file named: package.json (Ctrl-Shift-A -> NPM configuration file)
Open the file and under devDependencies add references to some needed packages, making the devDependencies section look like the following:
"devDependencies": {
    "gulp": "^3.9.0",
    "rimraf": "^2.4.0",
    "gulp-typescript": "^2.7.6",
    "gulp-sourcemaps": "^1.5.2",
    "merge": "^1.2.0",
    "requirejs": "^2.1.18"
  }
In the Visual Studio solution expand the Dependencies node and make sure all packages are marked as installed (by showing a version number). If they aren’t – right click the NPM node and select “Restore Packages”.
4. Adding a Gulp file
Position in the projects root in solution explorer, press Ctrl-Shift-A and select “Gulp Configuration file”.
In the gulpfile, require in the following packages rimraf, gulp-typescript, merge, and fs.
Then we need to add a few gulp-tasks and configurations. For the TypeScript compilation we need to define a TypeScript Project Setting, some paths, a compile task and preferably also a watch task. Watch tasks enables automatic compilation of the TS files triggered by a save, something that makes the workflow much faster when iterating over small code changes.
The Gulpfile.js should look like follows:
var gulp = require('gulp'),
    rimraf = require('rimraf'),
    ts = require('gulp-typescript'),
    merge = require('merge'),
    fs = require("fs");

eval("var project = " + fs.readFileSync("./project.json"));

var paths = {
    npm: './node_modules/',
    lib: "./" + project.webroot + "/lib/",
    tsSource: './TypeScript/app/**/*.ts',
    tsOutput: "./" + project.webroot + '/scripts/app/',
    tsDef: "./TypeScript/definitions/"
};

gulp.task("clean", function (cb) {
    rimraf(paths.tsOutput, cb);
});

var tsProject = ts.createProject({
    declarationFiles: true,
    noExternalResolve: false,
    module: 'AMD',
    removeComments: true
});

gulp.task('ts-compile', function () {
    var tsResult = gulp.src(paths.tsSource)
					.pipe(ts(tsProject));

    return merge([
		tsResult.dts.pipe(gulp.dest(paths.tsDef)),
		tsResult.js.pipe(gulp.dest(paths.tsOutput))
    ]);
});

gulp.task('watch', ['ts-compile'], function () {
    gulp.watch(paths.tsDef, ['ts-compile']);
});

gulp.task("copy", function () {
    var npm = {
        "requirejs": "requirejs/require.js"
    }

    for (var destinationDir in npm) {
        gulp.src(paths.npm + npm[destinationDir])
          .pipe(gulp.dest(paths.lib + destinationDir));
    }
});
5. Prepare script folders
Under wwwroot create two folders, one named lib and one named scripts.
Under the scripts folder, create a new folder named app.
Test to make sure the gulp copy-task is setup correct by running it from for ex Task Runner Explorer. After it’s executed and no errors occurred, check to see if a new folder containing the require.js file has been copied to the lib folder.
6. Add TypeScript folders
Create a new folder in the project root named TypeScript, under that create three new folders named: app, definitions and extdefinitions.
The plan here is to keep all code that will be written to contain app logic in the app folder. The TypeScript compiler will output definition files for your code and put those in the definitions folder. And then there is the extdefinitions folder that will hold all the definition files that you have downloaded, imported or maybe written but are for code that you are not responsible for.
Now – finally time to add some TypeScript files!
7. Add TypeScript files to setup RequireJS

We need two TypeScript files, one named config.ts and one named main.ts, both under the TypeScript/app folder. (Position on the TypeScript/app folder and Ctrl-Shift-A as usual, but if you can’t see the TypeScript file type, expand the ASP.NET 5 tree node in the left hand column and select ASP.NET 5 Preview, this show the TypeScript File and it should be close to the JavaScript File)
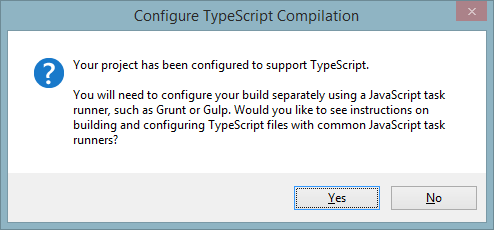
When creating the first TS file, a popup will show, reminding you that you have to configure compilation with a task runner like Gulp or Grunt and offer to show instructions, just click “No” to continue.
config.ts
/// <reference path="../extdefinitions/tsd.d.ts" />
require.config({
    baseUrl: 'scripts/app',
    paths: {},
    shim: {}
});

// load AMD module main.ts (compiled to main.js)
require(['main'],(main) => {
    var app = new main();
    app.run();
});
main.ts
class Main {
    runString: string;

    constructor() {
        this.runString = 'hello from main';
    }

    run() {
        alert(this.runString);
    }
}
export = Main;
But there’s squiggly’s under ‘require‘ in config.ts, to remedy this we need a definition file for RequireJS.
8. Get a definition file for RequireJS
There is a great project on GitHub named DefinitelyTyped. This project contains loads of definition files for different JavaScript libs and frameworks, see more info at definitelytyped.org. The easiest way to work with them is to install TSD – the TypeScript Definition Manager.
To install TSD, run
npm install tsd -g
from the Package Manager Console.
In Package Manager Console, navigate to the root of the project and run:
tsd init
Edit the ‘tsd.json’ file that init generated. Set path and bundle to our previously defined paths.
{
  "version": "v4",
  "repo": "borisyankov/DefinitelyTyped",
  "ref": "master",
  "path": "TypeScript/extdefinitions",
  "bundle": "TypeScript/extdefinitions/tsd.d.ts",
  "installed": {}
}
After it’s been installed it’s time to use it to get the definition file for RequireJS.
From the Package Manager Console (positioned in the root of the project) run:
tsd install require --save
This will now install the definition file for RequireJS and also add a reference to the ‘tsd.d.ts’ file. Now the easiest way way to reference the definition files in your project becomes a single use of the tsd.d.ts file. So to see the squiggly’s disappear and remove any compilation errors, just add this line above all code in the config.ts file:
/// <reference path="../extdefinitions/tsd.d.ts" />
9. Reference RequireJS and make it work
In the Index.cshtml file created when setting up the MVC parts, add a script to reference and init RequireJs. In the Head-tag add the following:
<script data-main="scripts/app/config.js" type="text/javascript" src="~/lib/requirejs/require.js"></script>
Make sure all your TypeScript files are compiled, and run the app via the web command or IIS Express.
You should now get an alert box from the browser of your choice saying “hello from main”!
So, that’s the main.ts code being executed sending it’s message out to the world.
The end result of all this is subtle, but it’s hopefully a solid base to build upon when creating a larger application.
All code can be found in my GitHub repository.
Protip
1. Try to keep all generated .js files in one folder, this way you can empty it and recompile in case anything get’s fudged (setup a clean task for the folder).
2. It’s ok to have static .js files in a project. Some developers in your team might not be comfortable with TS. Just try and keep their .js files separated from generated files.
3. If some team members insist on only using JavaScript, you can create definition files for those files, making it easier to work with them for you from TS.
4. If you need to use external js libraries, TSD is your friend!
Happy coding! 🙂

Great article. That’s what I’m researching today!
Btw, I got CommandNotFoundException when typing npm in Package Manager Console, any ideas?
Thanks!
Thanks 😀
You need to have Node and NPM installed and it needs to be in your path.
To check if it is in the path, open a PowerShell window and type:
node --versionIf the installation is correct and node is in your path, it will show you the version installed.
If you have installed it but it’s not in your path, just add
;Path to your node installation(for ex C:Program Filesnodejs)
To the end of your Path variable on the “User variable” section of the Environment Variables on System Properties.
When you have done that you need to reopen VS2015 and then try again.
Good luck! 🙂
Pingback: Getting started: TypeScript 1.5 in Visual Studio 2015 | mobilemancer
Pingback: Getting started: TypeScript and MVC 6 from Visual Studio Code | mobilemancer
Pingback: Visual Studio Code Build Task Shortcut | mobilemancer
Pingback: TypeScript Classes | mobilemancer
Pingback: TypeScript Classes Part II | mobilemancer
Pingback: TypeScript Functions | mobilemancer
Pingback: Aurelia, Visual Studio Code and TypeScript | mobilemancer
Pingback: TypeScript Classes Part III – mobilemancer