
Setting up a TypeScript – MVC 6 project in VS Code
Welcome to this tutorial where we’re taking a look at how to set up a TypeScript – ASP.NET 5/MVC 6 project in Microsoft’s new lightweight IDE – Visual Studio Code (VS Code)!
Disclaimer: Please note that this article was written using Visual Studio Code v0.7.10 using the beta-6 bits on a Windows 10 machine. So if you are using a different version/OS/setup, some of the information in this article might not be accurate.
Downloading VS Code
If you haven’t installed Visual Studio Code, you can get it at https://code.visualstudio.com/.
Creating an ASP.NET 5 project
In VS Code there is no File -> New Project option as Visual Studio users are used to seeing. The easiest way to start a new project is instead to use the Yeoman scaffolding tool to create one.
1. Installing Yeoman
If you haven’t got Yeoman already installed on your system, you need to install it. If you have Node.js already installed on your system, you can use npm install to get Yeoman and the ASP.Net generator. Open a command window and type the following:
npm install -g yo grunt-cli generator-aspnet bower
2. Scaffolding an ASP.NET 5 web app
Start the scaffolding from the command window by placing in the folder where you want to create the project, then typing:
yo aspnet
- Select Empty Application
- Name your ASP.NET application
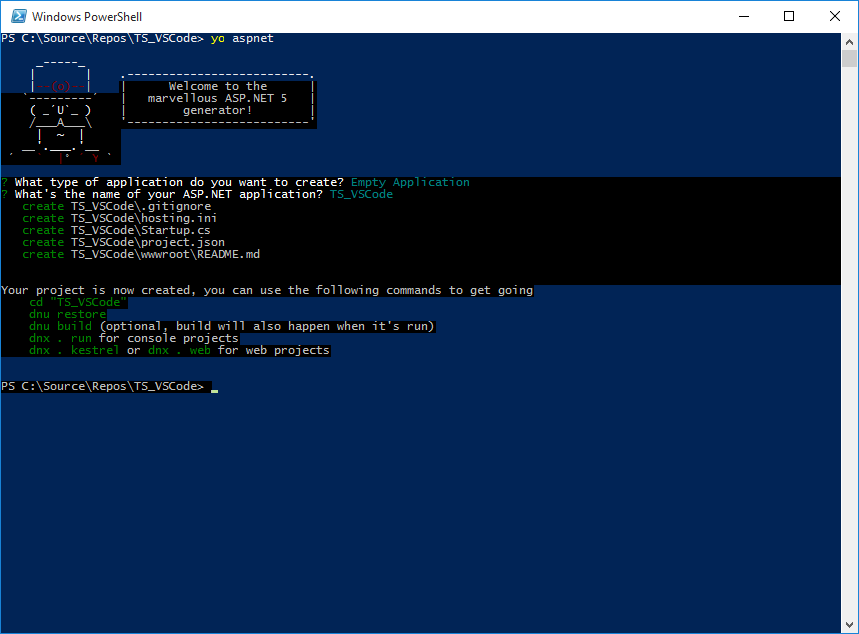
And the project is created…
3. Restore packages and build
Do as Yeoman says after scaffolding the project and update packages and build to make sure everything works ok, first move in to the folder where the project was created, then execute the following from the command prompt:
dnu restore
and
dnu build
“dnu” stands for DNX Utility where DNX stands for .NET Execution Environment and is the new runtime created for ASP.NET 5.
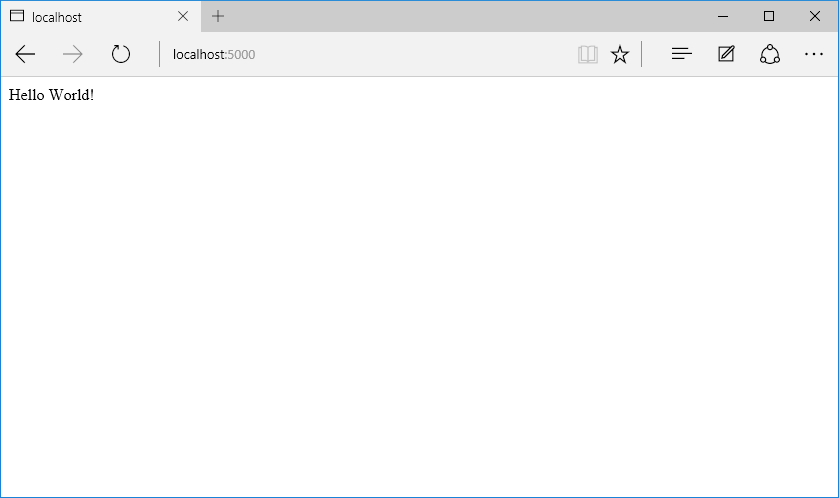
4. Running the project
If everything goes well with updating packages and building the project you can start it by typing:
dnx . web
This will start the web application at http://localhost:5000 so open a browser and enter this address to make sure your web application got started properly. The result will be a familiar response.
A small sidenote
If you are new to ASP.NET 5 and interested in where the applications endpoint is defined, you will not find any Web.config when looking in the project folder. Instead the “web” command that we ran is defined in project.json file and that in it’s turn is pointing towards the hosting.ini file for the information. If you open the project in VS Code by selecting File -> Open Folder and choosing the project folder, you will see the following:
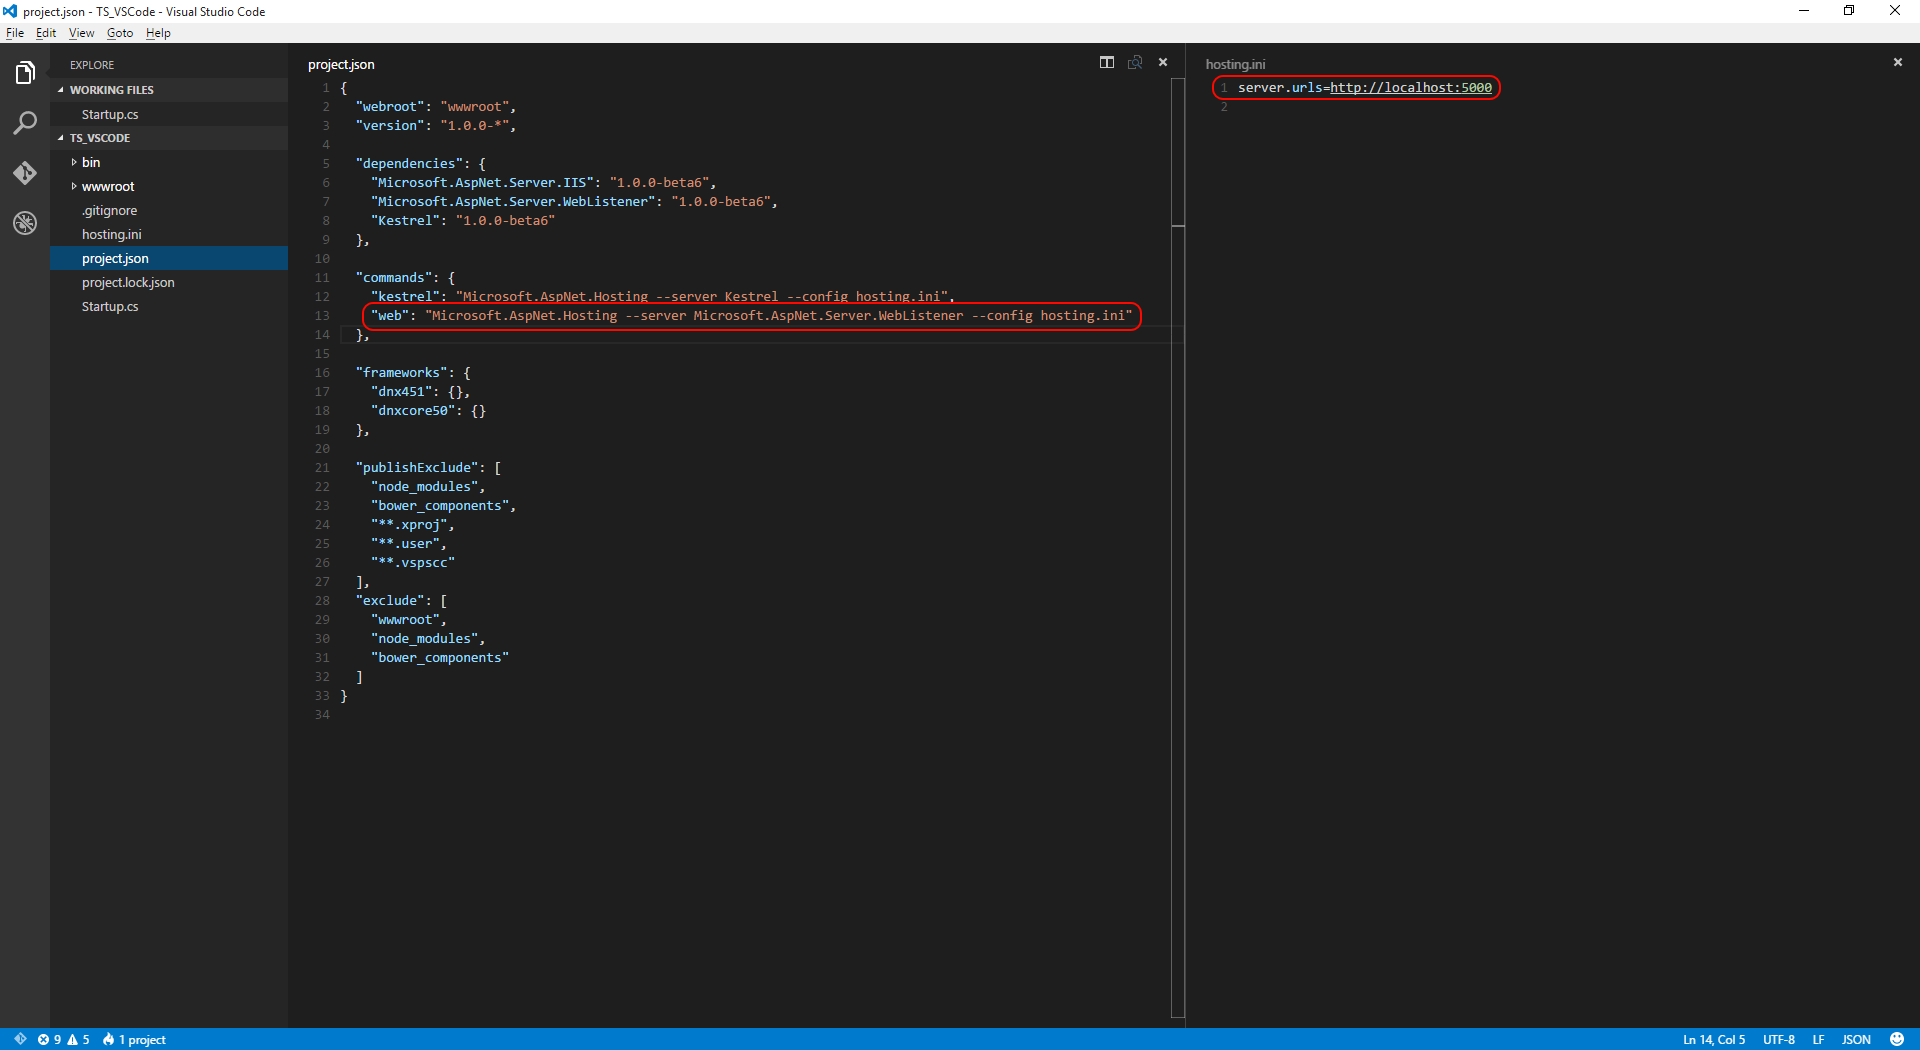
Serving static files
To be able to deliver static files like Html and JavaScript files, we need to add a reference to Microsoft.AspNet.StaticFiles as a dependency in project.json, like this:
"dependencies": {
    "Microsoft.AspNet.Server.IIS": "1.0.0-beta6",
    "Microsoft.AspNet.Server.WebListener": "1.0.0-beta6",
    "Microsoft.AspNet.StaticFiles": "1.0.0-beta6",
    "Kestrel": "1.0.0-beta6"
  },
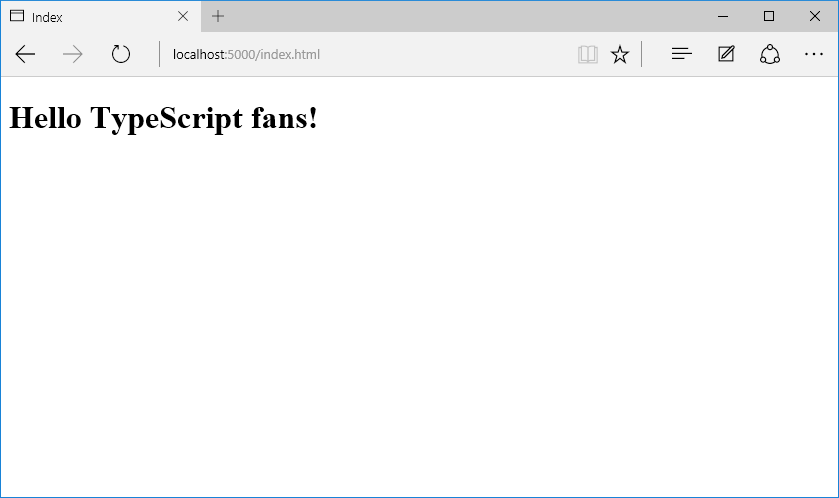
Now we can add an Html page so we can test the setup so far.
Add a file named index.html under the wwwroot folder and copy the following code into it:
<!DOCTYPE html>
<html>
<head>
    <meta charset="utf-8" />
    <title>Index</title>
</head>
<body>


<h1>Hello TypeScript fans!</h1>


</body>
</html>
We also need to fix Startup.cs as it has a hard coded greeting message in the template, and we need to instruct it to use static files.
using Microsoft.AspNet.Builder;
using Microsoft.Framework.DependencyInjection;

namespace TS_Code
{
    public class Startup
    {
        // For more information on how to configure your application, visit http://go.microsoft.com/fwlink/?LinkID=398940
        public void ConfigureServices(IServiceCollection services)
        {
        }

        public void Configure(IApplicationBuilder app)
        {
            app.UseStaticFiles();
        }
    }
}
Now go back to your command line, build the app with
dnu build
and after that, run it with
dnx . web
Then open a browser and enter the url http://localhost:5000/index.html, now you should see the greeting from our index.html page.
Setting up TypeScript
To get our TypeScript compiler up and running we need to add a few node modules to our project and also a task runner, I’ll use Gulp in this tutorial.
But first we’ll add a TypeScript file and the correct folder structure.
Adding a TypeScript file
Add a folder named TypeScript in the root of the project, it will hold our TypeScript files.
Then add a file named test.ts to the TypeScript folder, edit it and make it do something simple, like for example pop an alert with a greeting:
//Using Visual Studio Code is fun!
alert("Hello from TS!");
Adding node modules
First add a package.json file in the root of of the project, edit it and add the following:
{
  "version": "1.0.0",
  "name": "TS_Code",
  "private": true,

  "devDependencies": {
    "typescript": "^1.5",
    "gulp": "^3.9.0",
    "gulp-typescript": "^2.8.0",
    "merge": "^1.2.0"
  }
}
Now open a command line window and position in the root of the project, to install the packages specified in the new package.json file execute the following command:
npm install
Adding Gulp
Add a new file in the root of the project, name it gulpfile.js and add the following content:
var gulp = require('gulp'),
    ts = require('gulp-typescript'),
    merge = require('merge'),
    fs = require("fs");

eval("var project = " + fs.readFileSync("./project.json"));

var paths = {
    npm: './node_modules/',
    lib: "./" + project.webroot + "/lib/",
    tsSource: './TypeScript/**/*.ts',
    tsOutput: "./" + project.webroot + '/scripts/',
    tsDef: "./TypeScript/definitions/"
};

var tsCompilerConfig = ts.createProject({
    declarationFiles: true,
    noExternalResolve: false,
    module: 'AMD',
    removeComments: true
});

gulp.task('ts-compile', function () {
    var tsResult = gulp.src(paths.tsSource)
        .pipe(ts(tsCompilerConfig));

    return merge([
        tsResult.dts.pipe(gulp.dest(paths.tsDef)),
        tsResult.js.pipe(gulp.dest(paths.tsOutput))
    ]);
});

gulp.task('watch', ['ts-compile'], function () {
    gulp.watch(paths.tsSource, ['ts-compile']);
});
Running Gulp tasks in VS Code
To run the tasks we just setup press Ctrl-Shift-P to open the Command Palette in VS Code. To run tasks type ‘run task’ and hit enter (or select the option from the Command Palette).
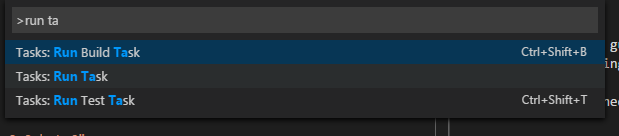
Now you should get a list of tasks to open, it will show all the tasks we defined in the gulpfile, namely ts-compile and watch.
Side note
If you haven’t installed Gulp globally on your development machine previously, the output window will open up in the right split pane and tell you
'gulp' is not recognized as an internal or external command, operable program or batch file.

Running gulp --tasks-simple didn't list any tasks.

Did you run npm install?
This is fixed by installing Gulp globally on the machine by running the following from a command line
npm install --global gulp
Run TypeScript compilation in VS Code
To run the TS compiler, run the task ts-compile.
This should compile our test.ts file to a file named test.js and place it under the wwwwroot/scripts folder.
Make sure the file is in place and open it. Now the comment that we added in the test.ts file should be removed as well, due to the TypeScript compiler setup in the gulp-file specifying
removeComments: true
Automatic TypeScript compilation in VS Code
It is possible to setup a watch task that tracks any eventual saves to TypeScript files and then automatically compiles them. It is already configured in our gulp-file and it is the task tat’s named watch. So, run the watch task and all TypeScript files will be automatically compiled on every change and save.
Test the project
To test the entire setup and make sure the web server is delivering our newly compiled script, we will call it from our html-file.
Add a reference to the compiled test.js file in the HEADER-tag of the index.html document, like this:
<script src="scripts/test.js"></script>
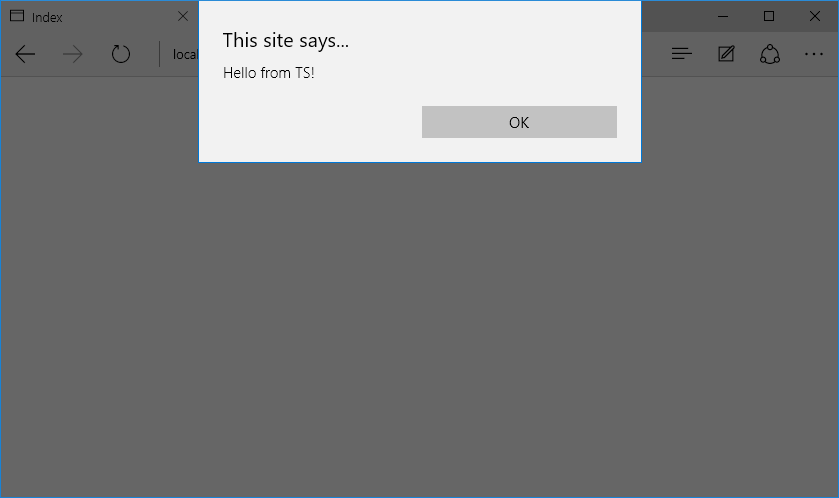
Start the application by opening the Command Palette with Ctrl-Shift-P as before and start typing ‘dnx’ and run ‘dnx: web’, this will execute the web command specified in the project.json file and start the application for us. After this use your browser and go to http://localhost:5000/index.html yet again. The difference this time is that you should see an alert pop up and say “Hello from TS!”.
Get the Code!
You can find this project on my GitHub account.
More TypeScript projects
If you are interested in setting up a TypeScript – MVC 6 app in VS2015, check out this post: Getting started: TypeScript 1.5 in Visual Studio 2015
If you are interested in a more advanced setup of a TypeScript – MVC 6 app that uses RequireJS in VS2015, check out this post: Setting up a TypeScript – RequireJS – Gulp – MVC 6 Web Project in Visual Studio 2015 RC
Happy coding! 🙂
4,800 files in VS2015 to create an asp.net 5 / TS / bower / npm / gulp monstrosity, LOL
gulp.watch() above needs to update the source directory too I think.
I miss my Think C and Turbo Pascal days, when things were so, so simple.
Good thing we got more than 32GB discs these days at least, huh? 😀
Big thanks for pointing out the gulp error, fixed the post and the repo!
Sincerely,
A
Pingback: Visual Studio Code Build Task Shortcut | mobilemancer
Pingback: TypeScript Classes | mobilemancer
Pingback: TypeScript Classes Part II | mobilemancer
Pingback: VS Code, Debugger For Chrome and ASP.NET 5 | mobilemancer
Pingback: TypeScript Functions | mobilemancer
Pingback: TypeScript Classes Part III | mobilemancer
Pingback: Getting started: TypeScript 1.5 in Visual Studio 2015 | mobilemancer
Pingback: ASPNET5 with VSCode | Visual Studio Code
Pingback: Aurelia, Visual Studio Code and TypeScript – mobilemancer