How to: Fetch data from Web API on ASP.NET Core to an Aurelia SPA
Fetching data from a Web API to our Aurelia SPA
Welcome to this third episode in the blog series about writing an Aurelia SPA with a Web API hosted on ASP.NET Core.
This post will focus on getting data from the Web API into our Aurelia SPA.
We will also start looking into Aurelia views and try out a few ways to list the initial data we receive.
The “Aurelia SPA built with TypeScript and Sass on .NET Core” Series
These are the parts of this blog post series about building a SPA in Aurelia.
In this post we will make our SPA retrieve data from the API that we created in the previous post. After we’ve gotten the data we will look at how we can render it in our SPA. The intent is to use the Aurelia Fetch Client, and we’ll look at how to get that up and running in an Aurelia CLI project like our SPA.
Using Fetch in an Aurelia SPA
For retrieving data we will use the Aurelia Fetch Client. I will use Chrome and Edge for testing this, and both those browsers has an implementation of the Fetch API. Do notice that if you want to run on any other browser it might not support the Fetch API. If you are using a browser that do not support Fetch you need to use a polyfill. If you are unsure, check your browser support here: Fetch on caniuse.com.
Installing the Aurelia Fetch Client
We’re going to use npm to install our packages, so open your favorite CLI and enter the following:
npm install aurelia-fetch-client --save
Now we need to add it to Aurelia.json in the dependencies section, add the following row:
"aurelia-fetch-client"
Using the Fetch Client in an Aurelia View
Add an import for the fetch client to app.ts at the top:
import {HttpClient} from 'aurelia-fetch-client';
Now, if you build the SPA from the CLI with au build, you’ll get a slew of errors. All hailing from missing definitions for the fetch client. So, we need to add some type definitions.
Add Typings for the Fetch API needed by the Aurelia TypeScript webapp
Installing type definitions is easiest done using Typings.
So if you haven’t got Typings installed already, it’s time to install it. Install Typings by running the following in a CLI:
npm install typings --global
Add typings for the Fetch API by entering the following two lines in a CLI:
typings i dt~whatwg-fetch -GS
typings i dt~whatwg-streams -GS
Compiling the Aurelia SPA after this will still produce an error, it will claim it can’t find “URLSearchParams”. Now this is actually a fault in the TypeScript definition files. This error will hopefully soon go away in a future version of TypeScript. But it’s possible to solve it now by either
Adding a dummy definition temporarily in a file created by yourself
Importing a temporary definition file
Let’s use the second option and import a definition to this project, then we can remove that typings reference if ever this problem get’s fixed! Import this definition by entering the following:
Now, there’s a few new concepts being introduced here, so let’s talk have a look at them.
Dependency Injection and Autoinject
In Aurelia we can use Dependency Injection to get access to members we need. The easy way to use this with TypeScript is:
Import autoinject from the Aurelia framework
Use the @autoinject decorator on top of the class declaration
Create a private member in the constructor definition, detailing what member should be initialized
TypeScript will now automatically define a class wide private field for the above defined members for us!
In our example above, the private member named http is accessible in the entire class. See how it’s used further down in the activate method.
Using the Fetch Client
First we configure our http client in the constructor, telling it to use the “standard configuration” and also giving it a base address.
In the Activate method we then use the fetch client to call the Web API. We tell it to convert the repsonse to json and store that json result in our droids array.
So let’s build the SPA and open a browser and test it!
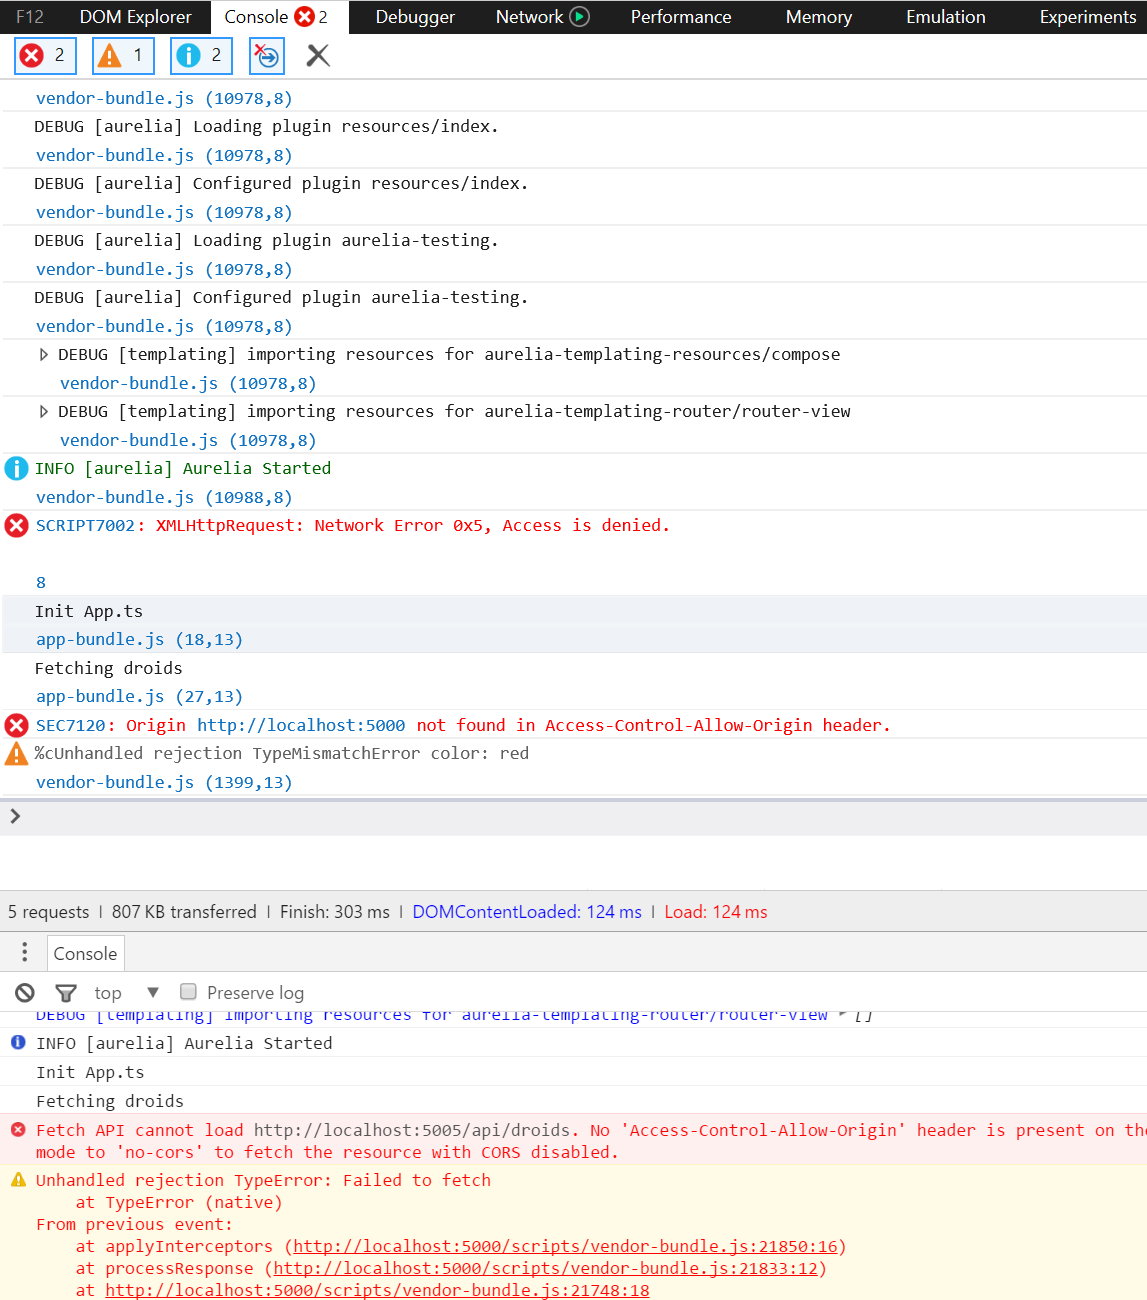
CORS errors in Edge and Chrome
As can bee seen in both Edge and Chrome, we get a CORS error when requesting data from the Web API. To fix this we need to enable CORS requests in the Web API.
Configuring CORS in the ASP.NET Core Web API
We need to modify our Web API and enable CORS requests. We do this by defining a CORS policy that can be used in our pipeline when serving requests.
Open Startup.cs in the Web API Project. Modify the ConfigureServices method like this:
public void ConfigureServices(IServiceCollection services)
{
var corsBuilder = new CorsPolicyBuilder();
corsBuilder.AllowAnyHeader();
corsBuilder.AllowAnyMethod();
corsBuilder.WithOrigins("http://localhost:5000");
corsBuilder.AllowCredentials();
services.AddCors(options =>
{
options.AddPolicy("AureliaSPA", corsBuilder.Build());
});
// Add framework services.
services.AddMvc();
//DI
services.AddSingleton<IDroidRepository, DroidRepository>();
}
What we have done now is to setup a CORS policy, which is quite relaxed, all we do is say “allow any traffic from localhost:5000” basically. Then we tell the Web API to use this rule in the pipeline, in the Configure method.
This means we will allow all traffic coming from our Aurelia SPA, hosted on localhost:5000.
Notice! If you change the url of the Aurelia SPA, remember to change this CORS policy as well!
Testing with CORS Enabled
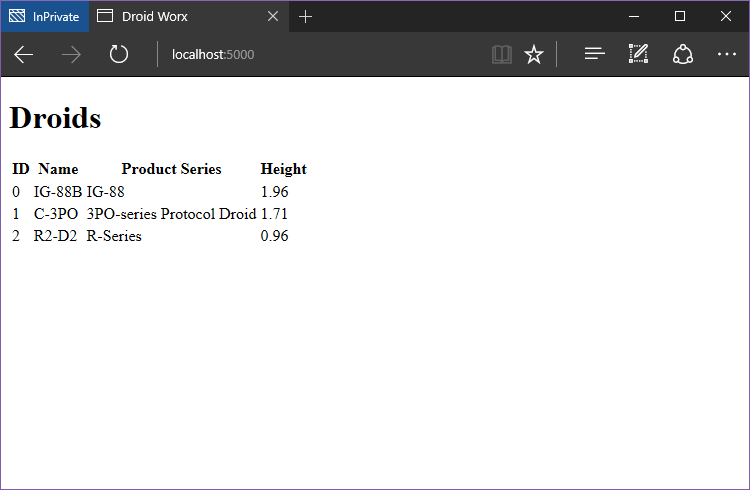
Running the app again after enabling our CORS policy in the WEB API, we can see that the SPA renders properly and there are no CORS errors in the console.
However, there’s no API data showing in the UI, so how do we know that it works?
Well, either we just inspect the data in the dev tools, or we write some html to render our droids!
Implementing our first Aurelia View
Time to finally actually start implementing some front end code, after all it’s what this blog series is supposed to be about 🙂
This will be among the first times we actually start using Aurelia for creating views, and we’ll notice how smooth it is to use and how clean our html will be!
Let’s implement a table and to display the Droid data fetched from the Web API.
HTML Tables in Aurelia
Create a table as per usual in HTML with a head and a body.
Then, we want to data bind our droids to each row in the table. This is where we can use Aurelia’s Repeater. We use “repeat.for” to tell the view engine to create a new table row for each element in our droids array.
Try it out, edit app.html like this:
Now, the table might not be that pretty, but something else is…
Notice how clean the View (app.html) and the Model (app.ts) is! It’s just basic TypeScript and HTML practically. For the untrained eye, it’s possible to think that there might not even be any kind of framework involved at all here 🙂
Now this is a big thing as it means:
1. On-boarding of new developers in big projects will be easier.
2. If there’s ever a need to move from Aurelia to any other framework, it’s way easier as there’s less “cruft” to remove.
But I digress, back to the code.
The repeater is very versatile and can handle more data structures than Arrays. For ex it’s possible to iterate over Maps, Sets and numerical ranges.
And the repeater can be used on any element, like template elements and even custom elements. This is pretty awesome imho! 🙂
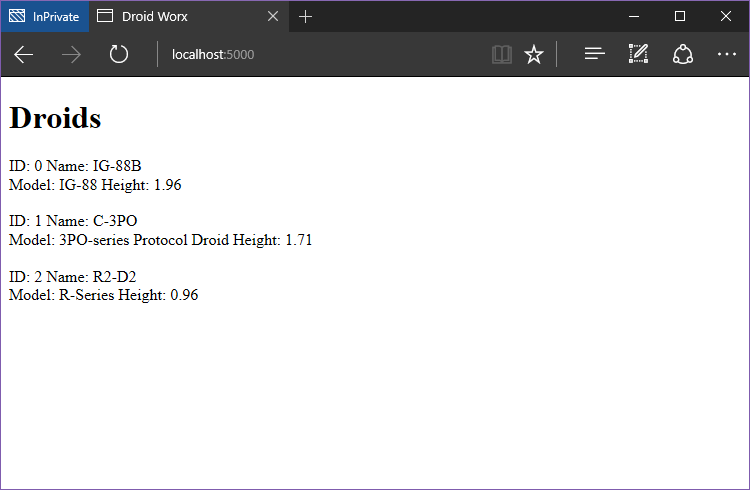
Using the Aurelia Repeater on a Regular div Element
Say we’d prefer not to use a table for our elements, but instead create another element structure to hold our information.
Let’s use the repeater on a div to hold our droid data from the Web API. Modify the app.html code like this:
Using the repeater to bind Array elements to an arbitrary element
That’s all for this episode, hope you enjoyed finally getting started with some more Aurelia specific code and actually producing some visible results.
Next Part – Creating custom elements to be used in our Aurelia SPA
In the next episode we’ll look at custom elements. How they enable composition reuse and lay a good foundation for testing of our SPA code.
Get the Code
The code for this blog series is available on my GitHub repo, you can find it here: DWx-Aurelia-dotNETCore
Until next time, Happy Coding! 🙂
How to: Fetch data from Web API on ASP.NET Core to an Aurelia SPA

Pingback: How to: Build a Web API on ASP.NET Core for an Aurelia SPA - mobilemancer
Pingback: How to: Build an Aurelia SPA with TypeScript on ASP.NET Core - mobilemancer
Pingback: How To: Configure and Use the Router in an Aurelia SPA - mobilemancer
Pingback: Unit Testing and E2E Testing an Aurelia SPA (CLI) - mobilemancer